Monday, March 21, 2016

Cascading Flower pallet planter box

Hi!  I'd love for you to follow me on Pinterest Her Tool Belt .

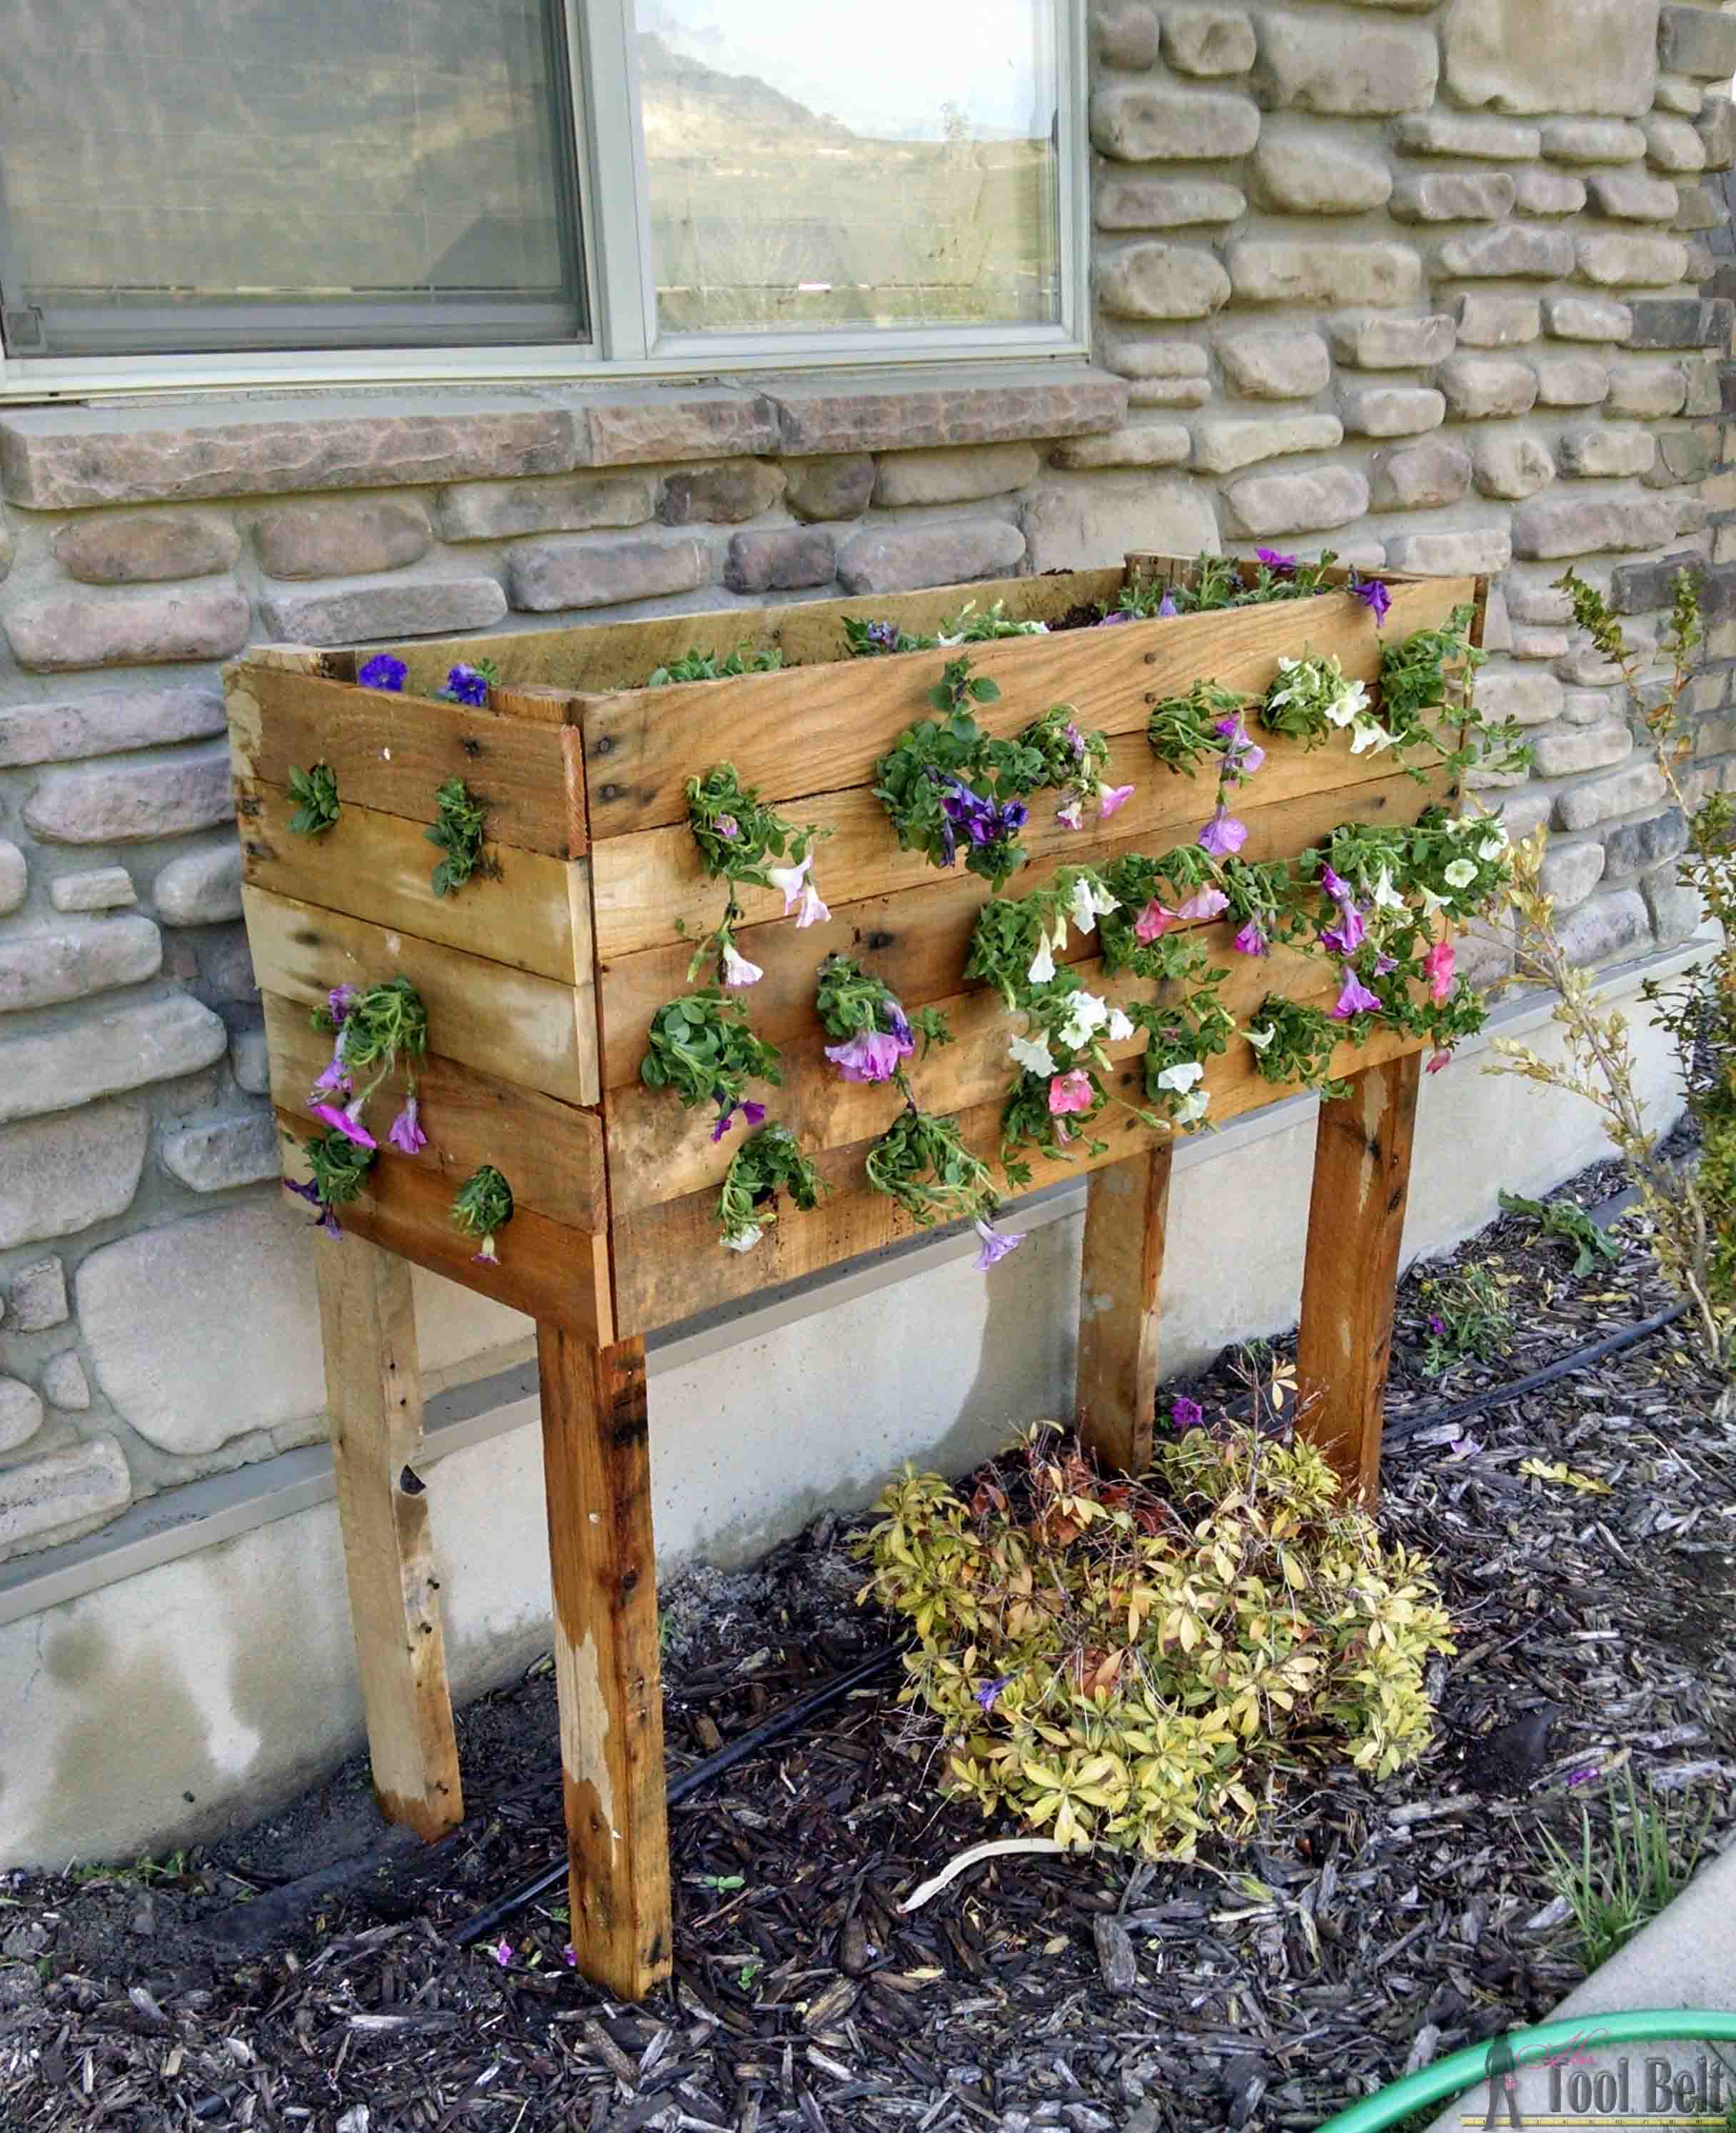
I have a dream... that some day I can grow those amazing cascading flower baskets like the ones from Bloom Master.  My home town has been hanging those baskets for the last 5-10 years or so, and they make main street look amazing.  My Mom plants them too, and her yard looks amazing.  I bought some of the large Bloom Master pots years ago thinking the cascading flowers would look awesome hanging off the back deck.  However the sun is really harsh during the afternoon, it gets overly windy, and every year I fail.  My flower pots look ok, but not full and stunning.  So this year, I'm trying it again but in the front yard where the flowers will be more protected.  I also want to dress up a window that's a little boring.  I built a large planter box out of pallets, since it is made from pallets I won't feel bad ruining the wood.  I'll post periodic updates to show the progress of the wave petunias, hoping for amazing!
This post contains some affiliate links that are noted.
Check out these flowers - DIY pallet planter box for those amazing cascading flower baskets.

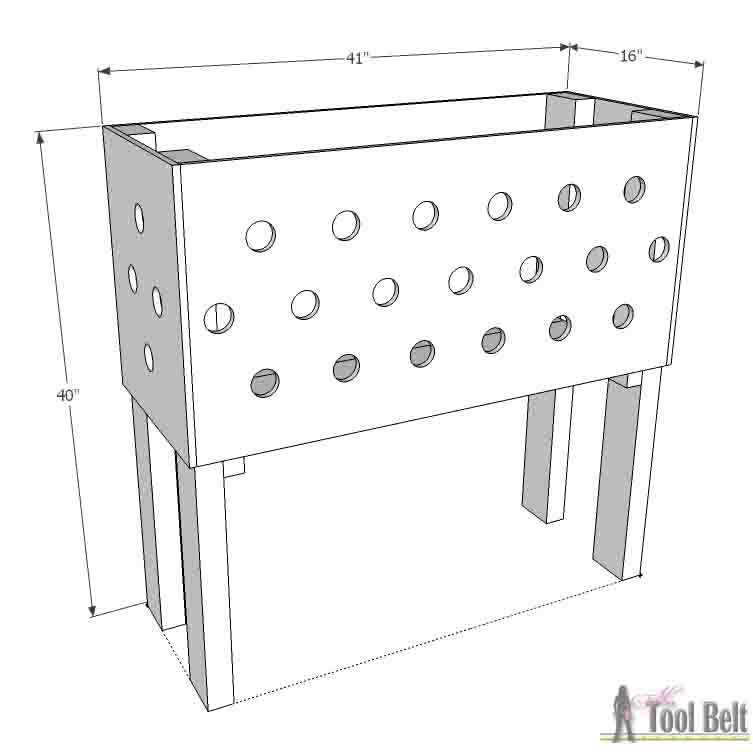
 How to Build a Cascading Flower Pallet Planter Box

Check out these flowers - DIY pallet planter box for those amazing cascading flower baskets.

Cut List

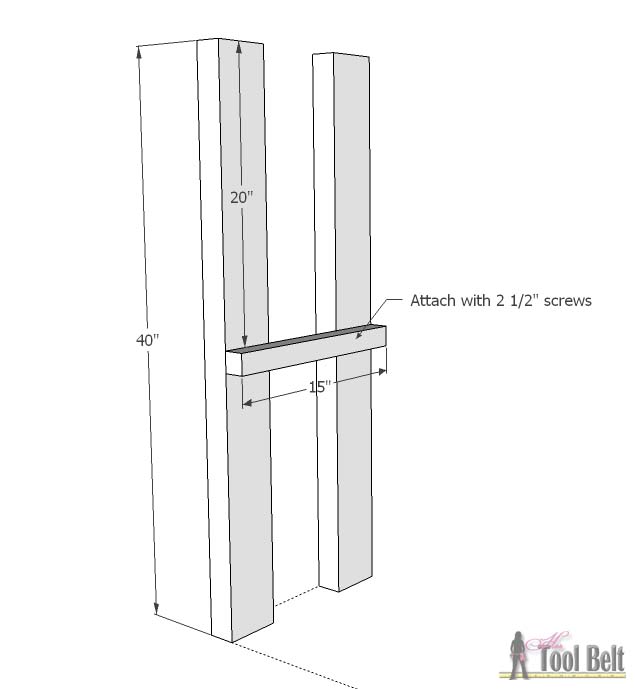
  • 4 - 2" x 4" x 40" - legs
  • 2 - 2" x 2" x 15" - bottom support
  • 4 - 1" x 4" x 36" bottom
  • 1 - 1" x 1 1/2" x 36" bottom
  • 40" long pallet slats as needed
  • 16" long pallet slats as needed

(Note: if you do not have access to pallets or are concerned about where the pallets have been, you can easily substitute pine 1x4's or cedar pickets found at stores like Home Depot.) 

Step 1

This planter box is made mostly from pallet wood, for tips on disassembling a pallet.  I tried to use the oak pallet slats, because I believe they'll hold up a little better overtime than pine.

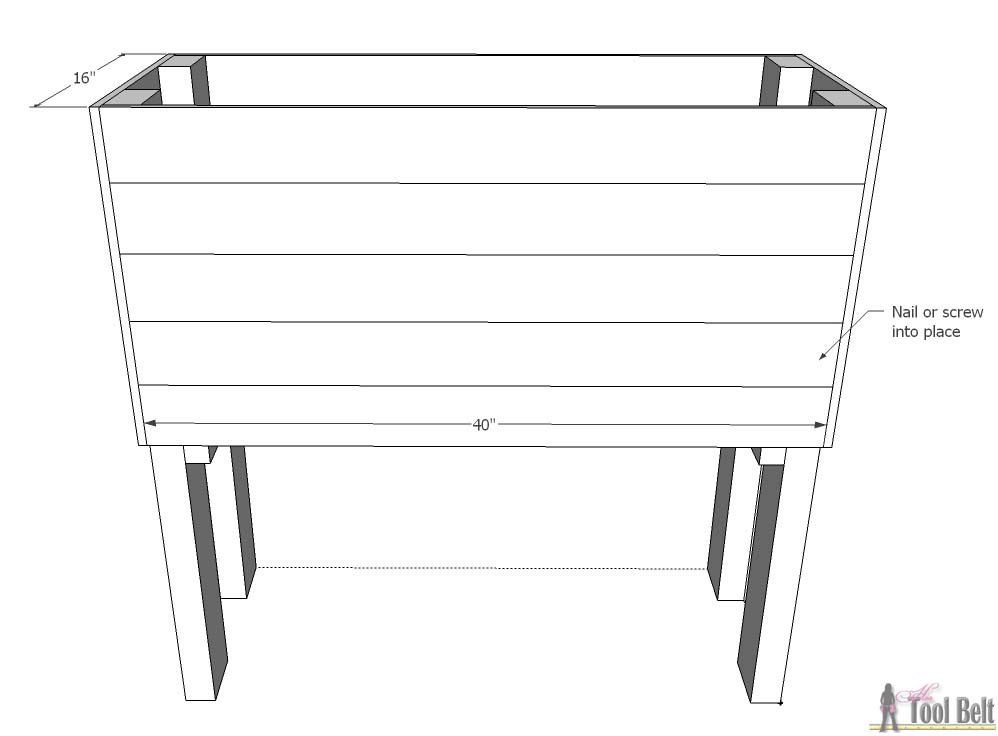
Measure and mark down 20" from the top of the legs.  Attach the 2x2 at 20" with 2 1/2" screws.  Repeat for the other set of legs.
Check out these flowers - DIY pallet planter box for those amazing cascading flower baskets.Nail or screw the bottom pieces to the 2x2 supports.
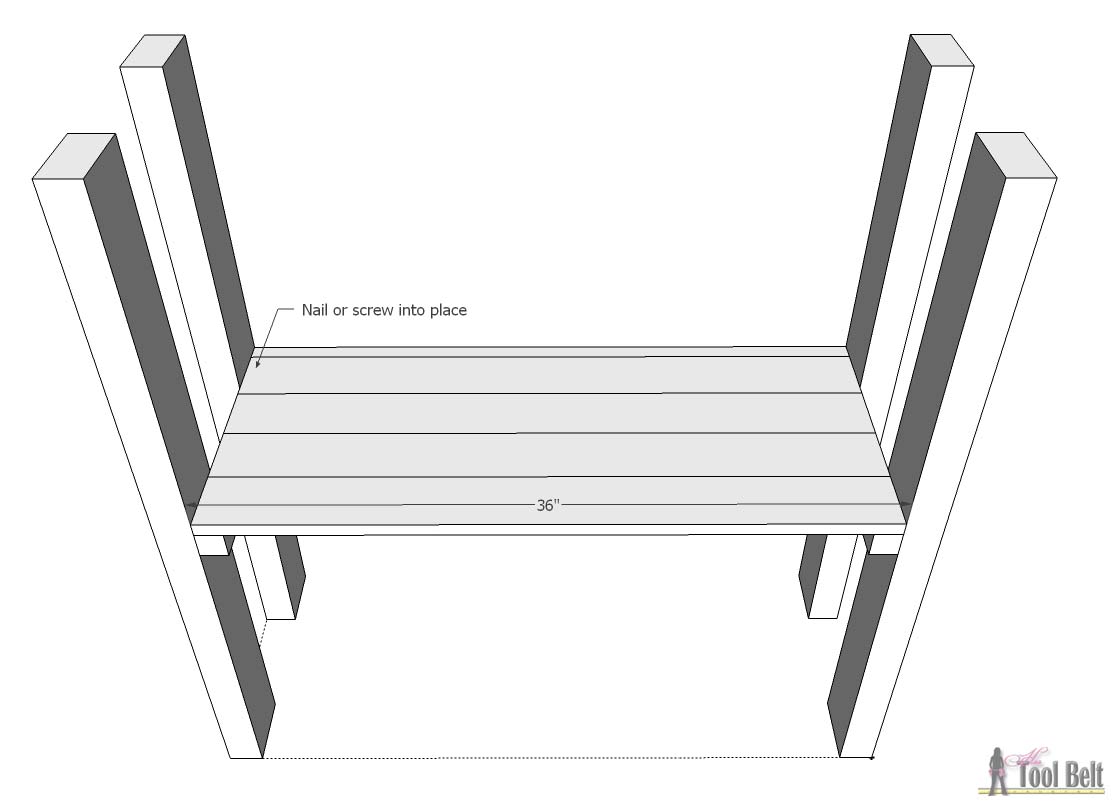
Check out these flowers - DIY pallet planter box for those amazing cascading flower baskets.

Step 2

Cut pieces of pallet slat to 40" and attach to the legs for the front and 16" for the sides.  I originally used a brad nailer, but some of the wood started to warp when wet and I went back and used 1 1/4" screws.
Check out these flowers - DIY pallet planter box for those amazing cascading flower baskets.I used a 2" hole saw (affiliate) to drill holes for the petunias.
Check out these flowers - DIY pallet planter box for those amazing cascading flower baskets.
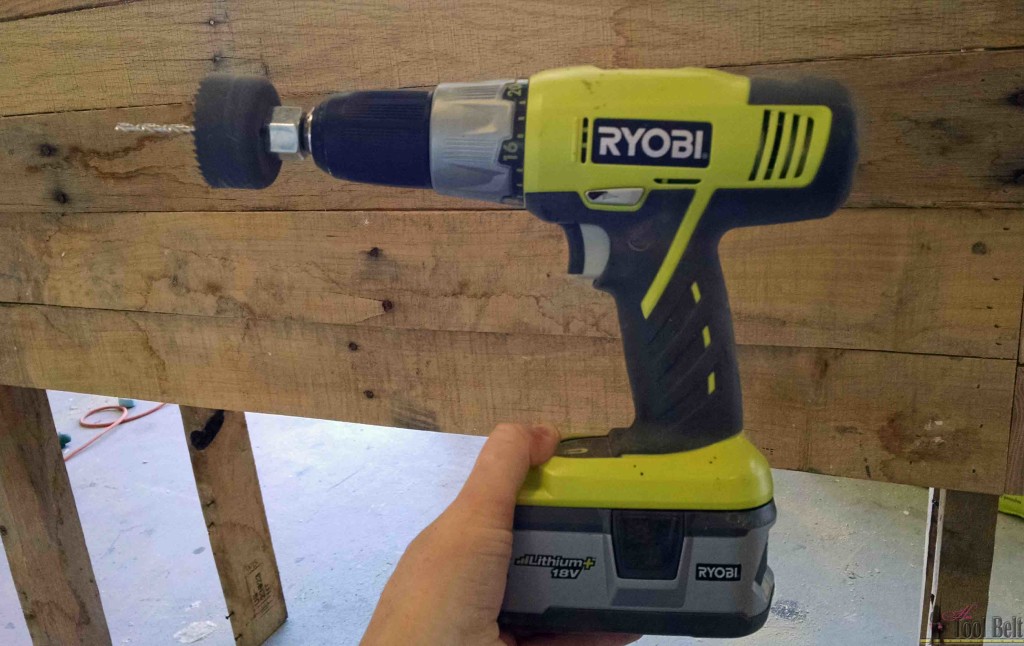
Spacing the holes about every 6" or so.
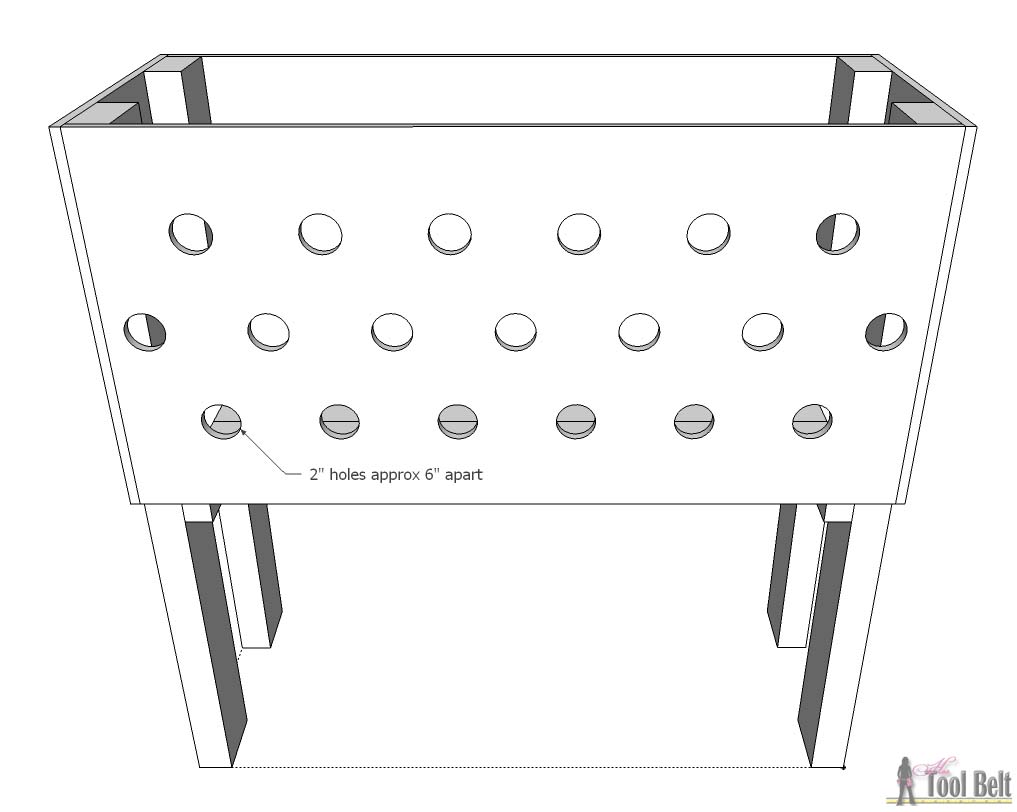
Check out these flowers - DIY pallet planter box for those amazing cascading flower baskets. Check out these flowers - DIY pallet planter box for those amazing cascading flower baskets.

Step 3

Now the fun part, planting the flowers.  These flowers are Wave petunias that I got at Costco, you can also rotate the flowers between regular, cascade and wave petunias.  You need good potting mix and you need to add soil moist (affiliate) to help retain water.  I put a layer of weed guard down on the bottom, because I had a few holes.
Check out these flowers - DIY pallet planter box for those amazing cascading flower baskets.
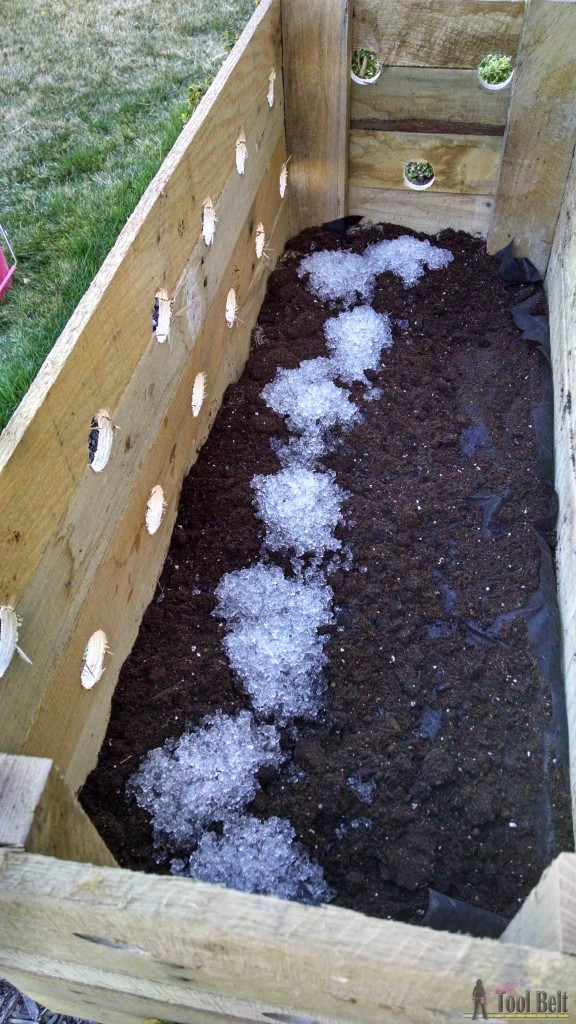
Add the first row of flowers, then cover with soil.  Check out these flowers - DIY pallet planter box for those amazing cascading flower baskets. 
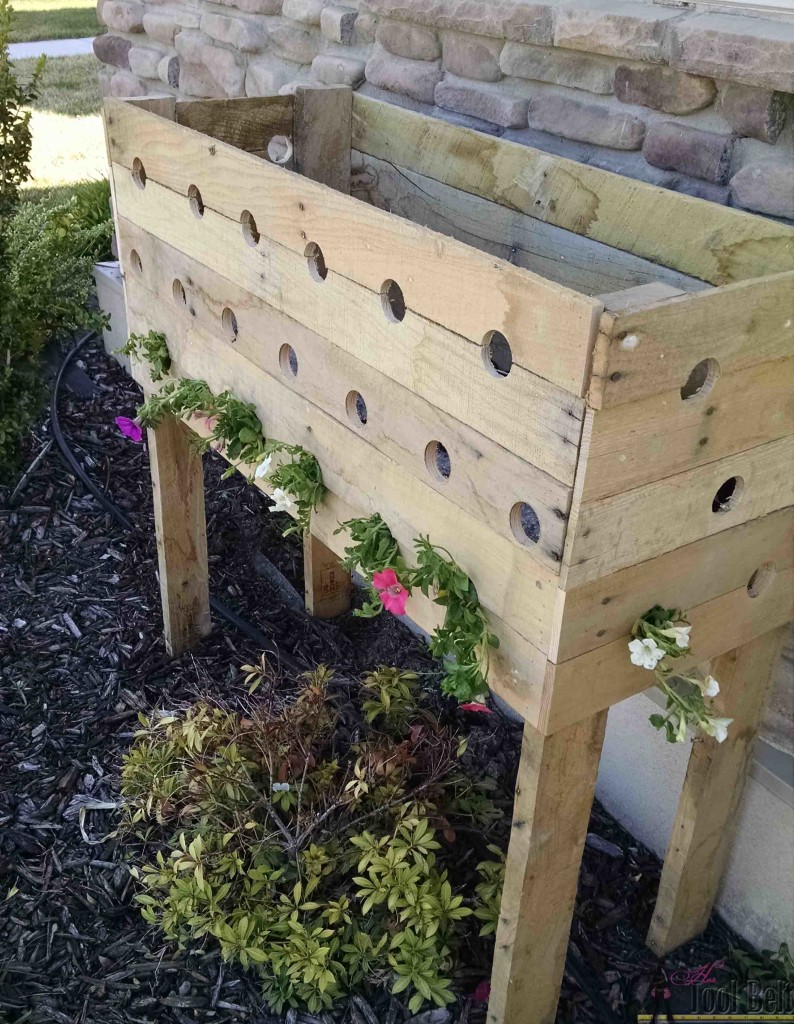
I realized that the box is kind of large and is going to use a lot of dirt (2 bags).  I remember reading somewhere that you can use packing peanuts as filler, hope I remember that right.  I put them in the far back where the flowers wouldn't be planted.  Check out these flowers - DIY pallet planter box for those amazing cascading flower baskets. 
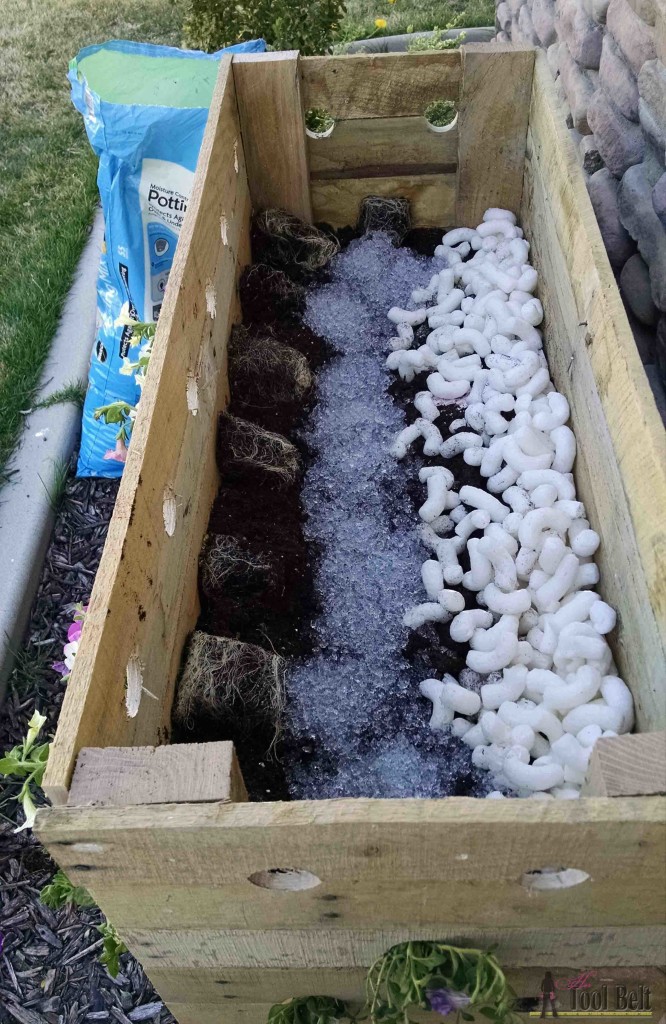
Then cover with more dirt.  Check out these flowers - DIY pallet planter box for those amazing cascading flower baskets.
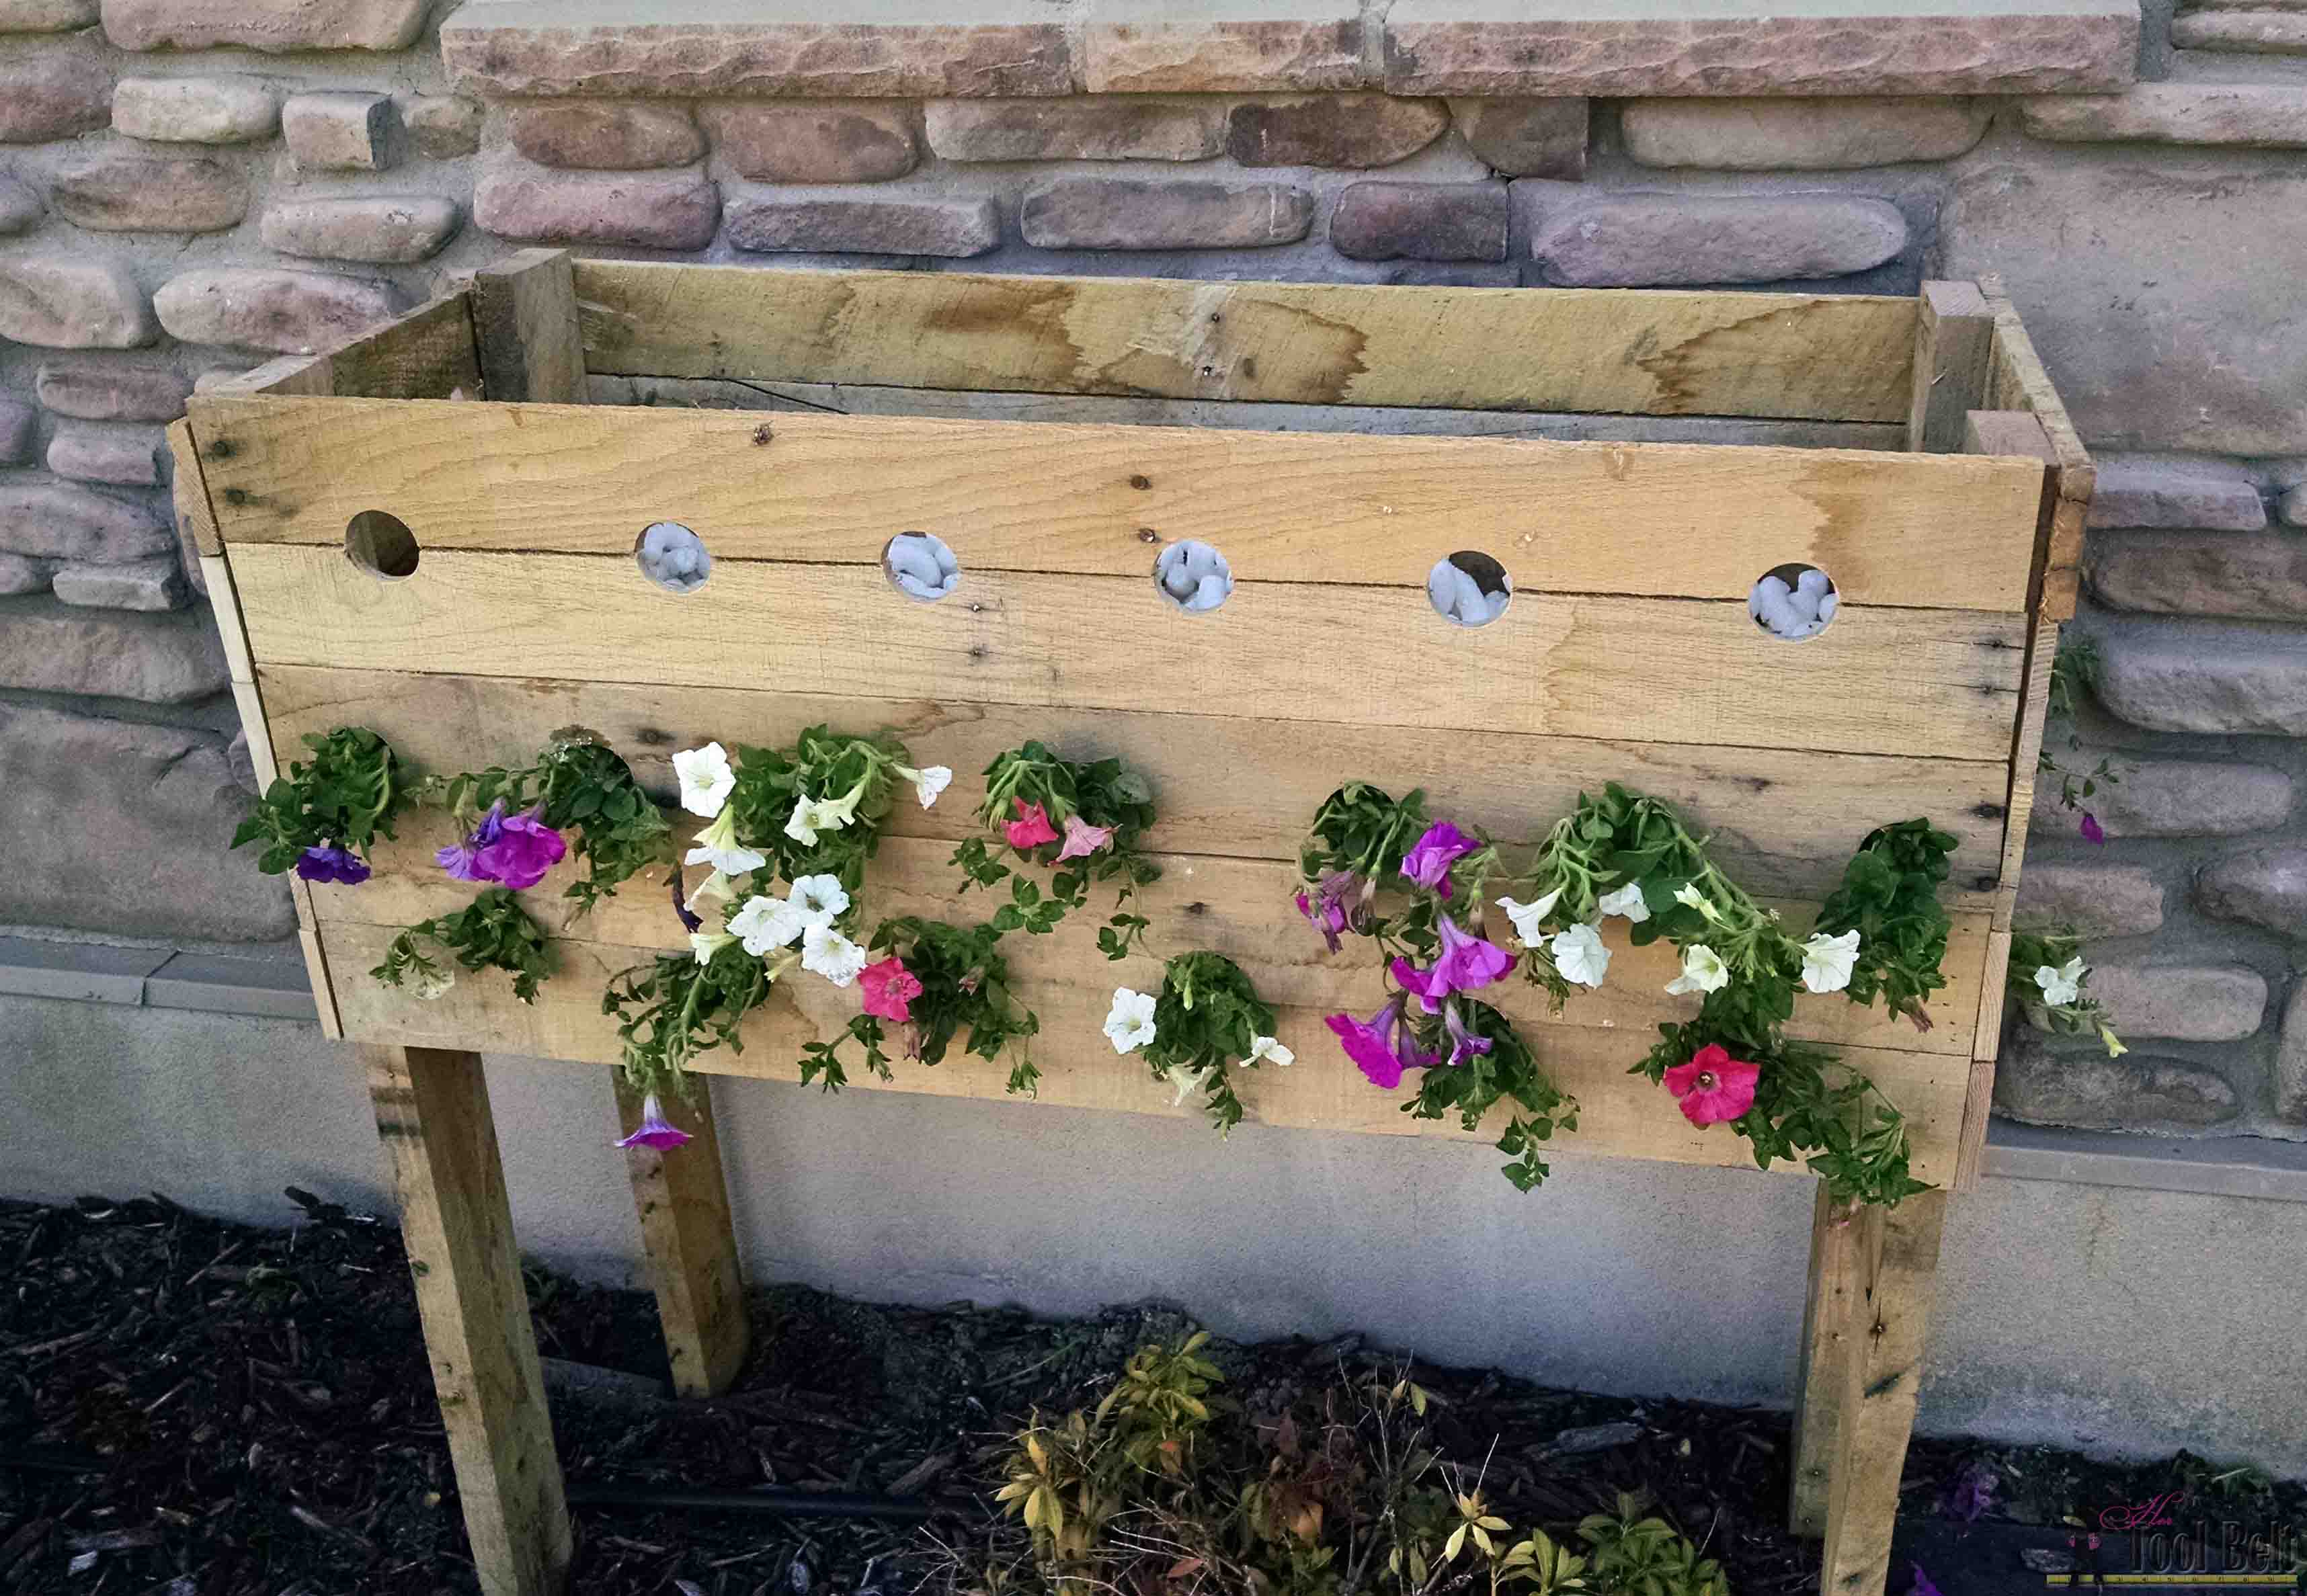
Add the third row of flowers, fill with dirt and plant flowers on top.

You need to water the flowers everyday, the holes let the dirt get dry.  I usually water until the water leaks from the lower holes.  I also fertilize 1/week. 

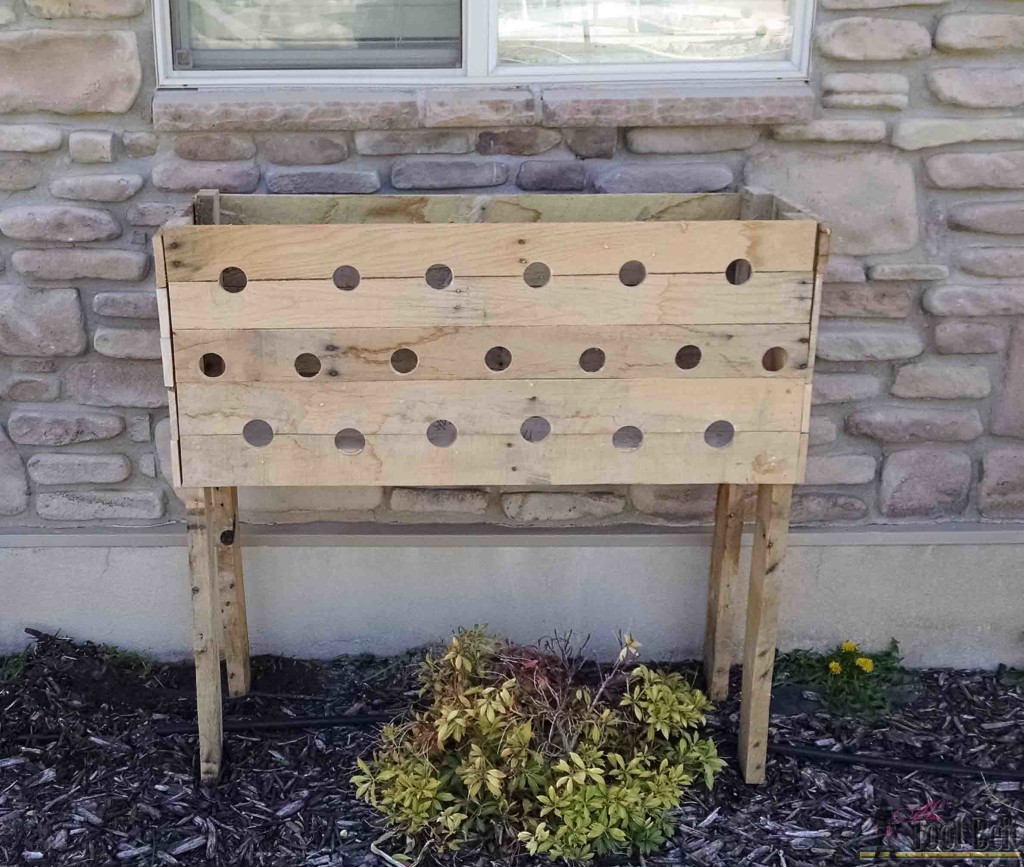
April 13 - first planted

Check out these flowers - DIY pallet planter box for those amazing cascading flower baskets.

May 20 - starting to grow

2 May 20 pallet box
I realized that the poor bush had been dead for some time, even though it had green on it.

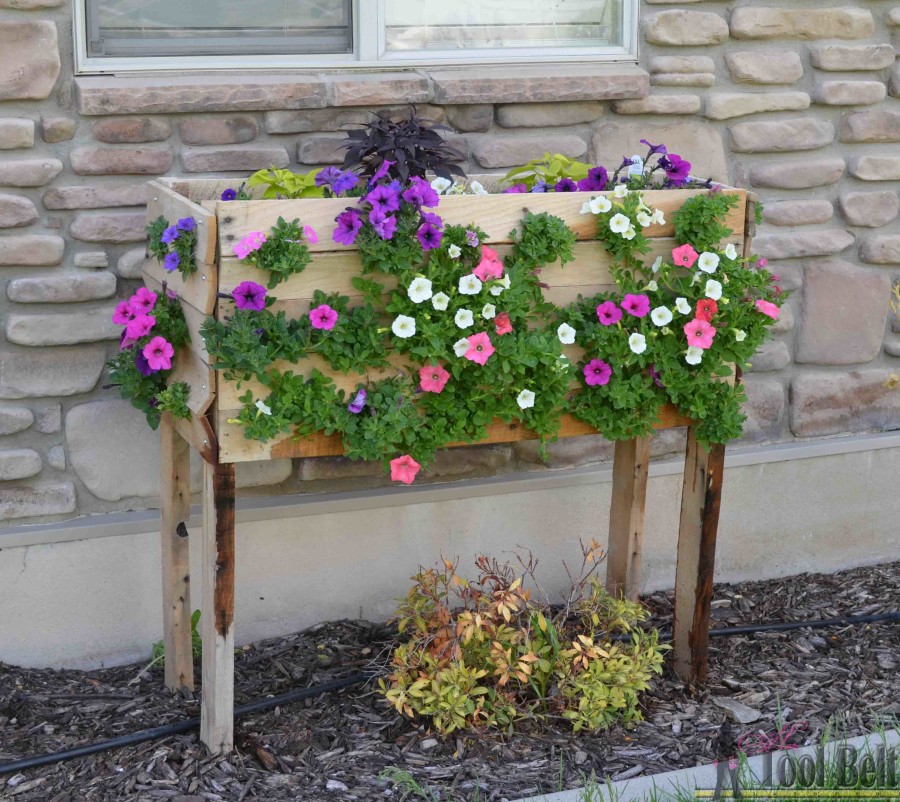
June 6 - filling in nicely

3 June 6 cascading flowers

June 22 - tickled pink

4 June 22 cascading flower pallet box

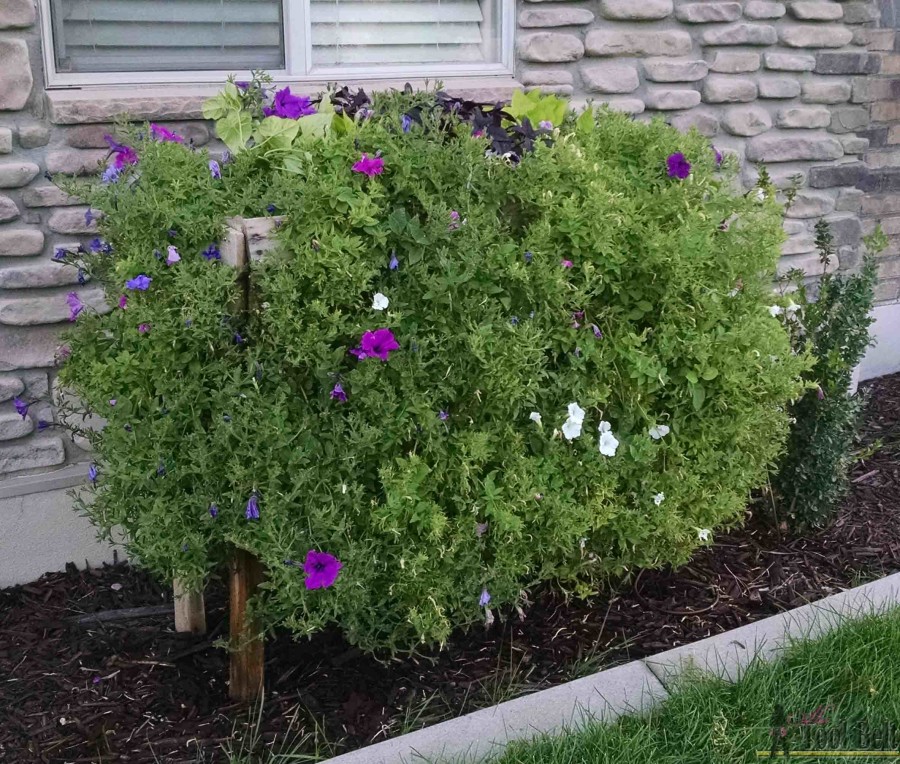
July 24 - little set back

It was the really hot part of the summer and the foliage was very green and pretty, but no flowers.  Realized I needed to spray for bugs and the flowers came back.  
5 July 24 palley planter box

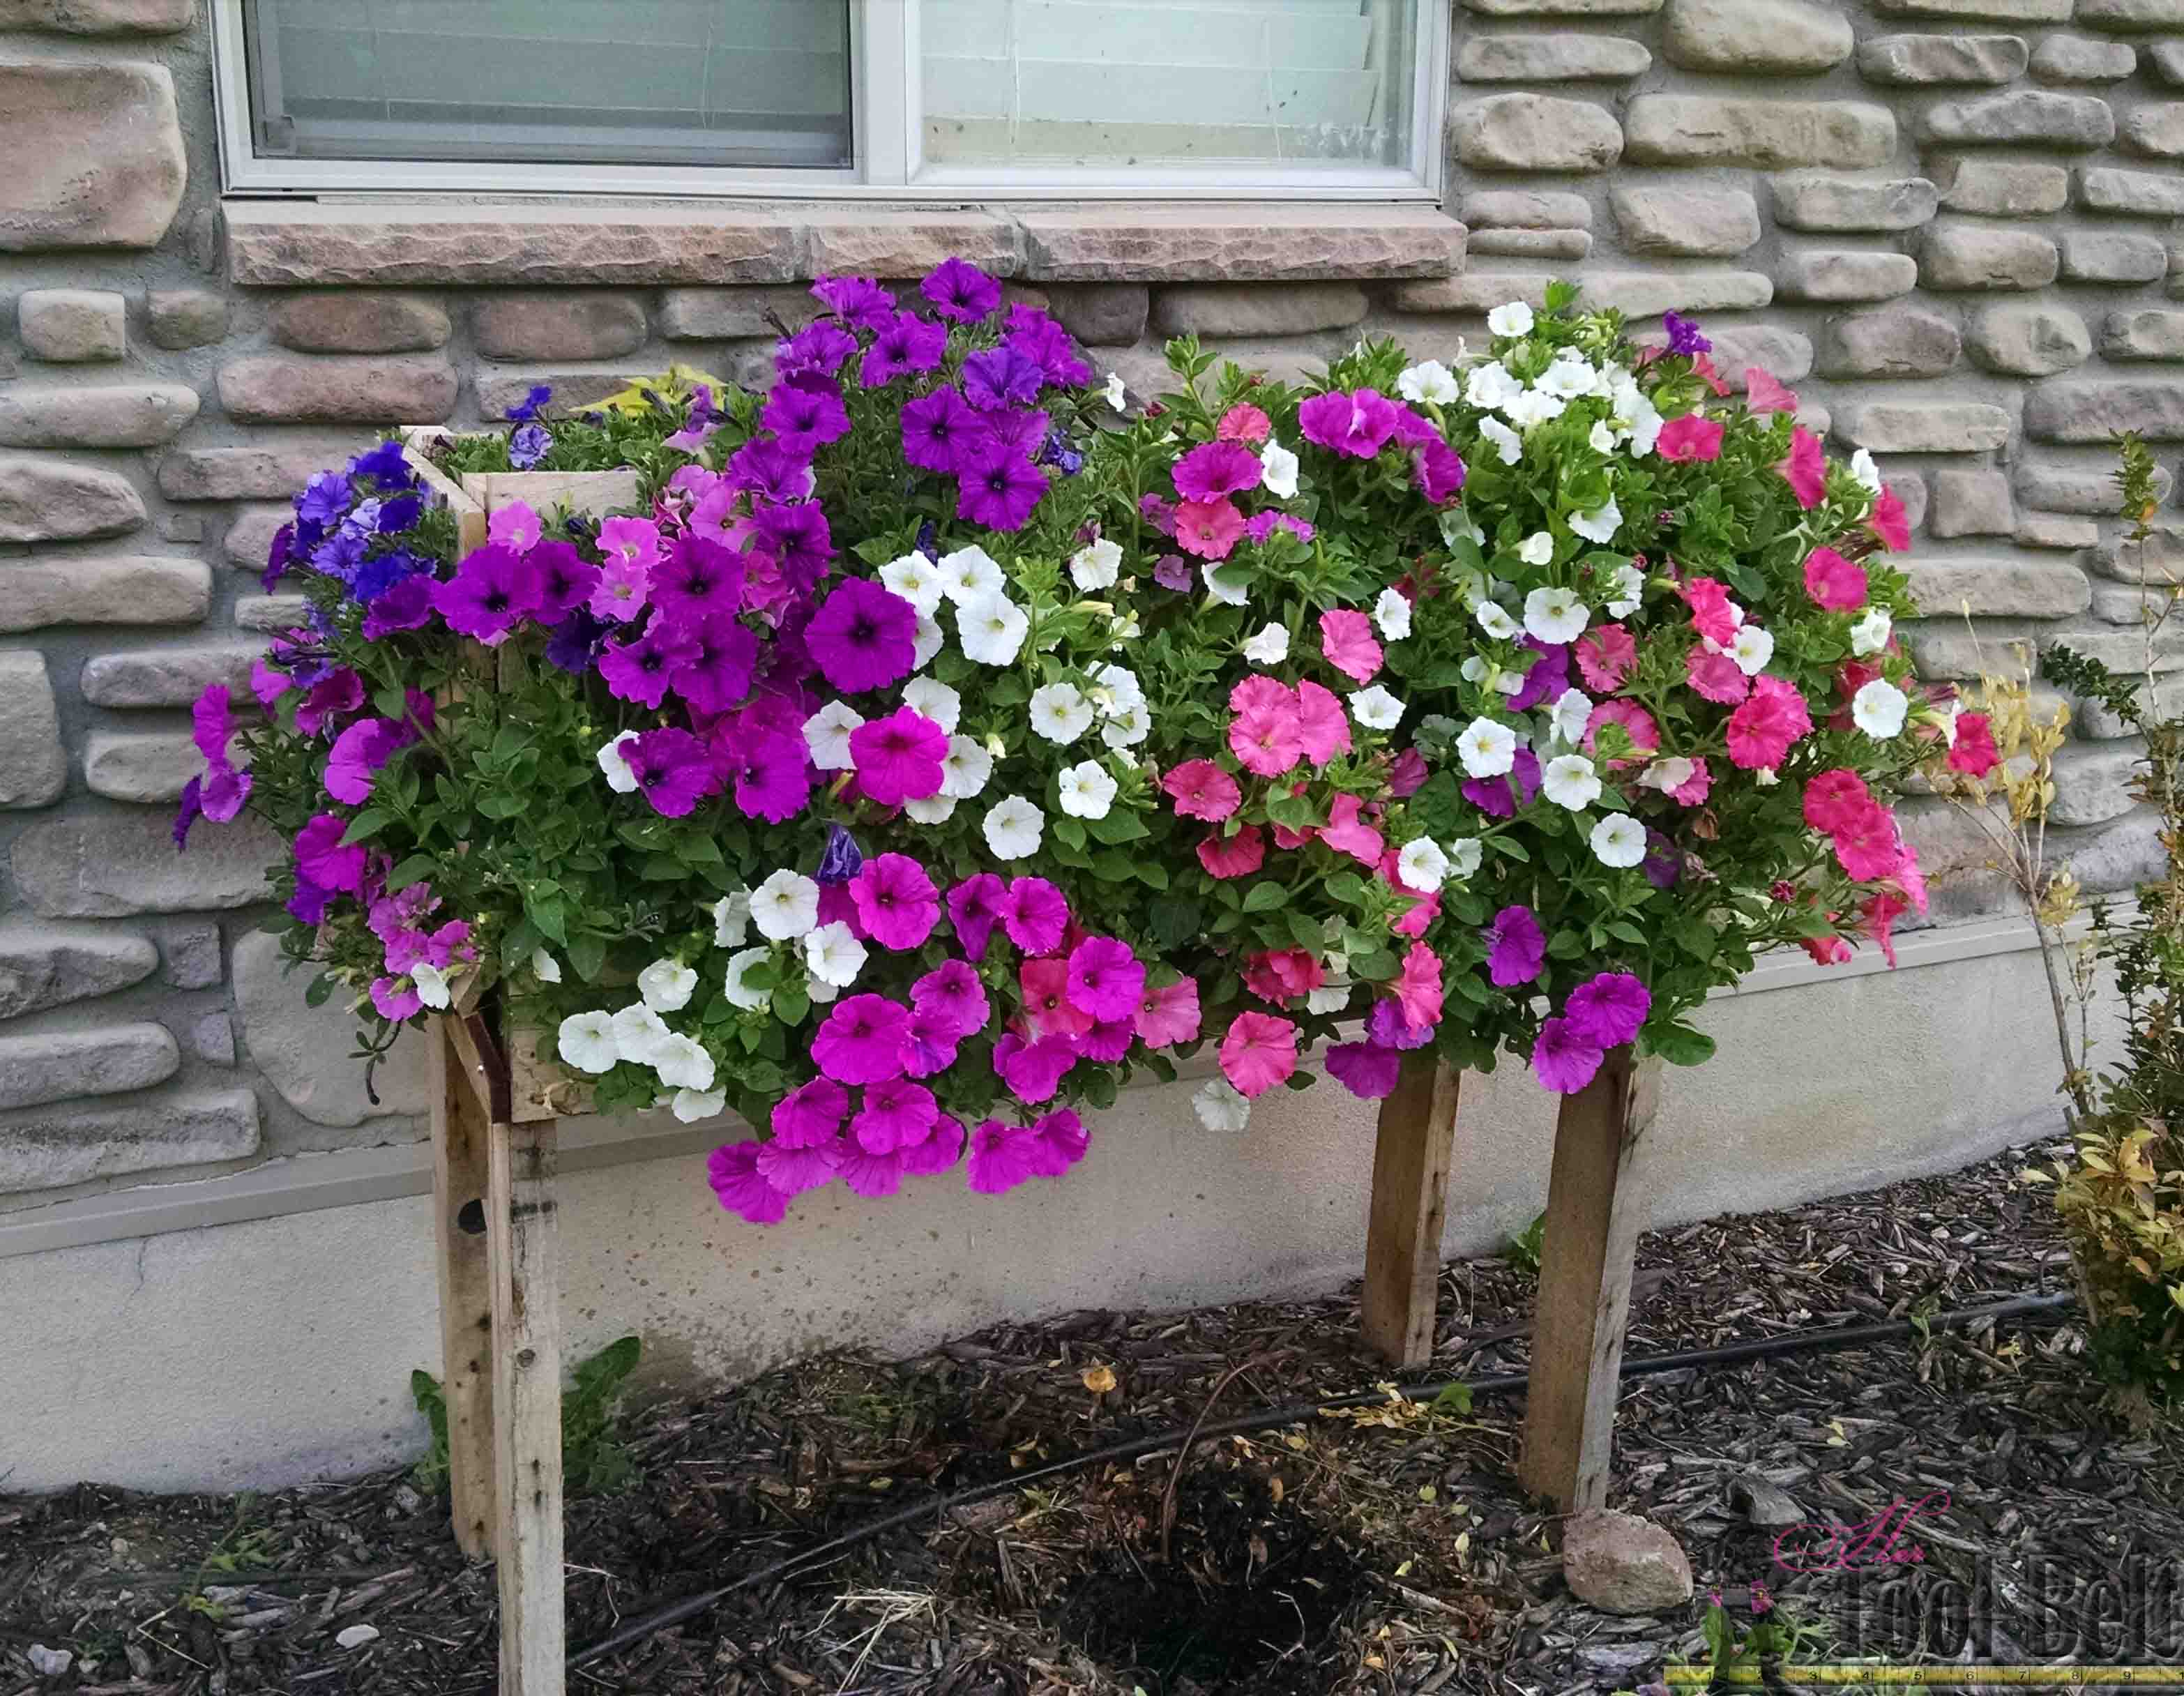
August 24 - looking good
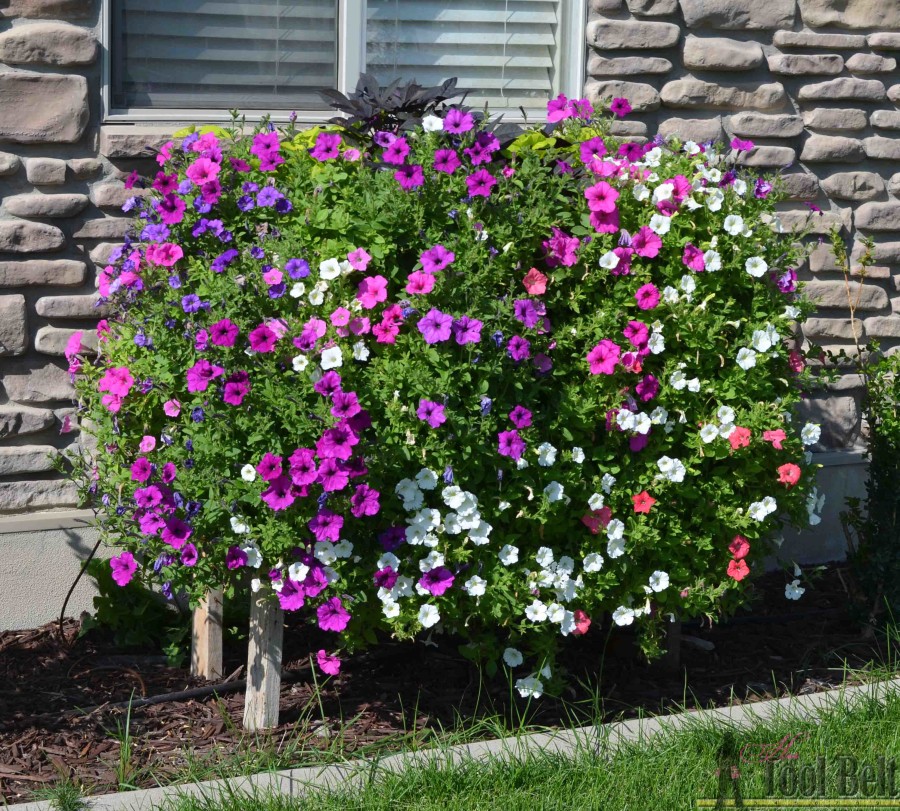
6 Aug 24 cascading flower palley planter

September 22

By this time I'm super excited it made it through the summer alive.  I never made it through July with the baskets on the back deck.
7 sept 22 wave petunia pallet flower box
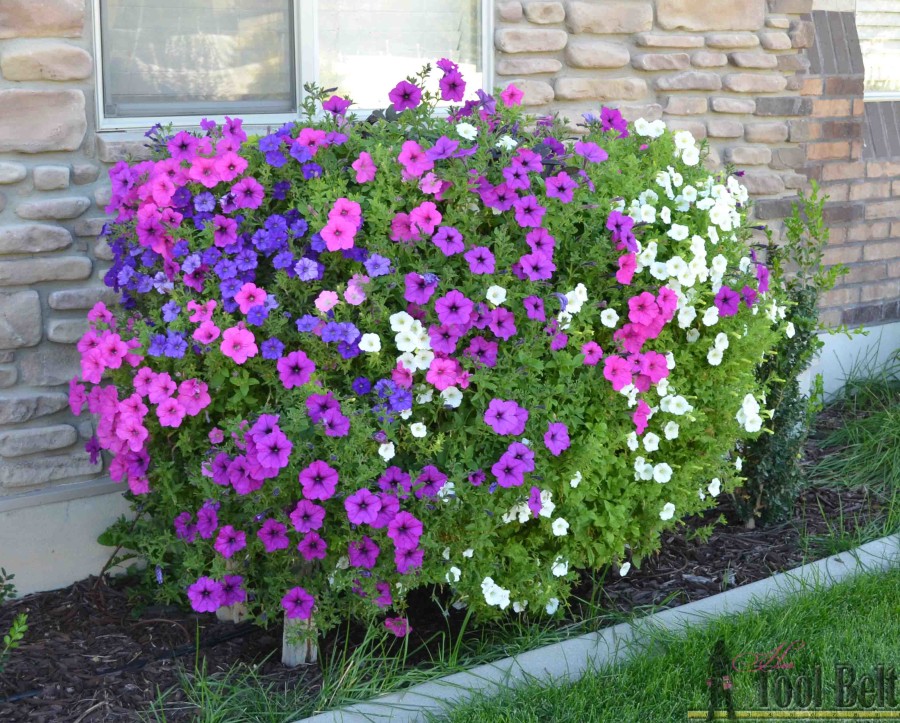
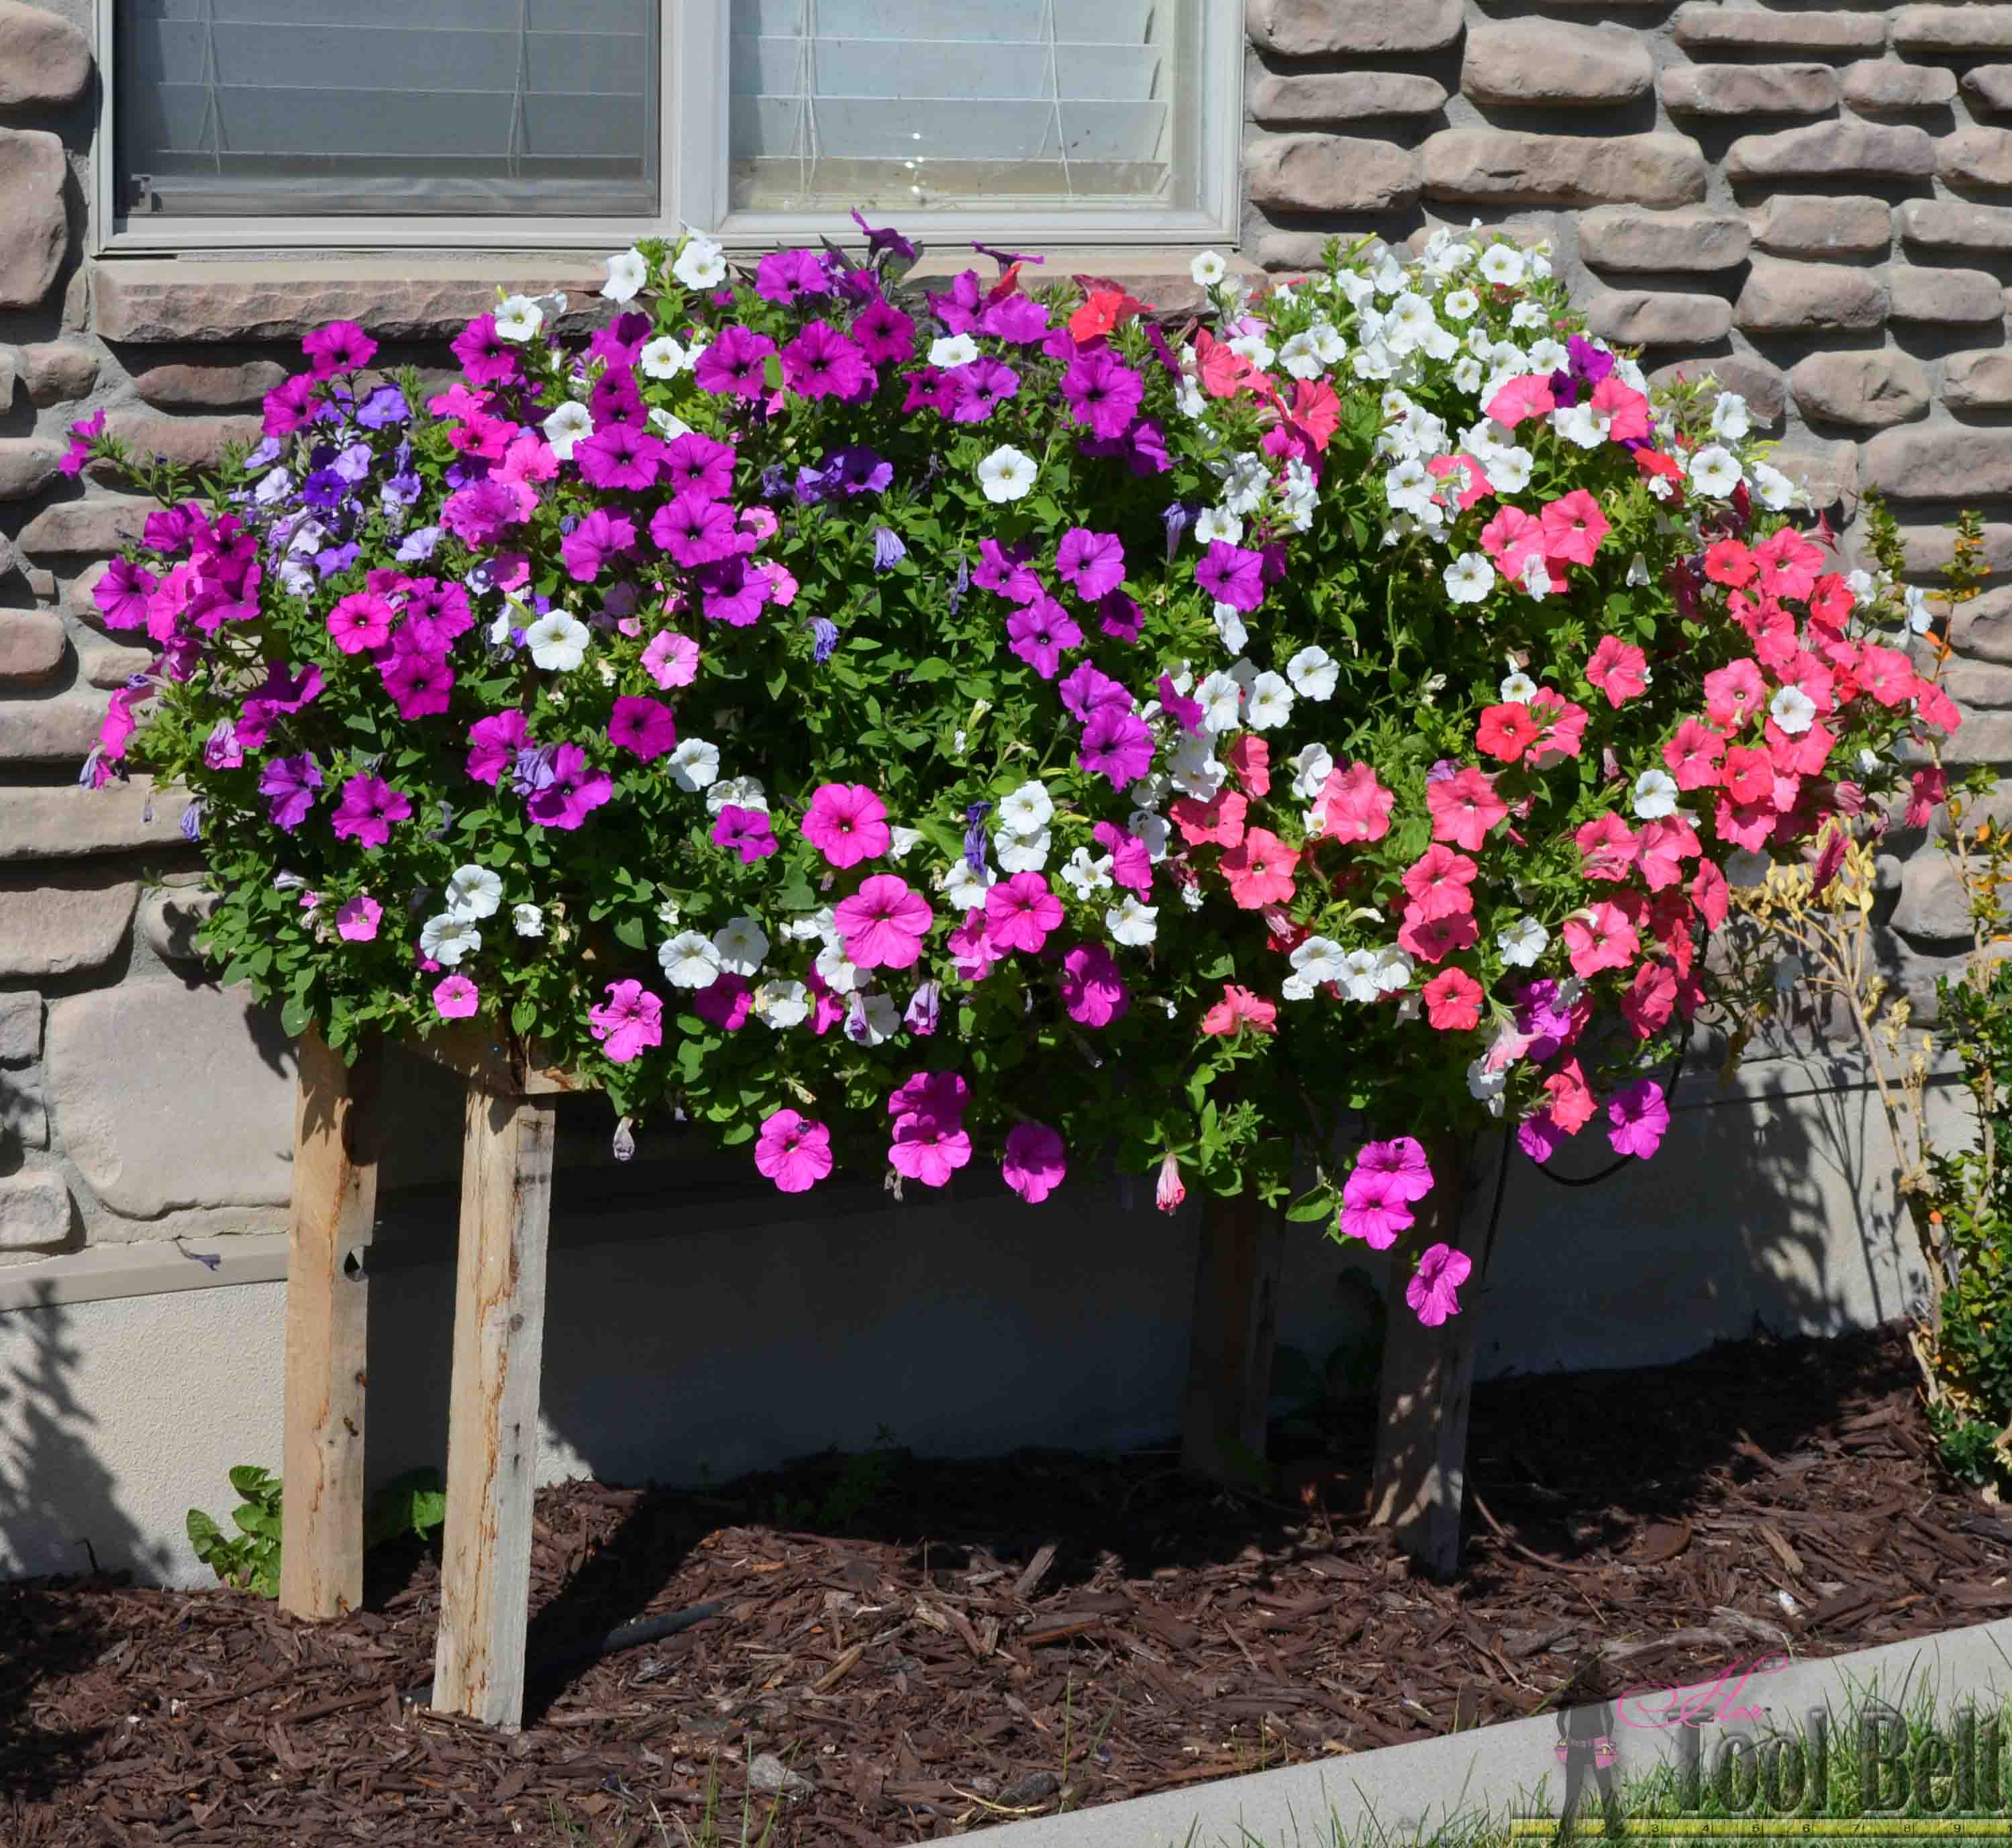
Sprayed it for bugs one last time, and one week later it looked amazing!  Here is the result of the flower box in late September, gorgeous!

September 29 - Amazing!

Cascading flower pallet planter box Sept
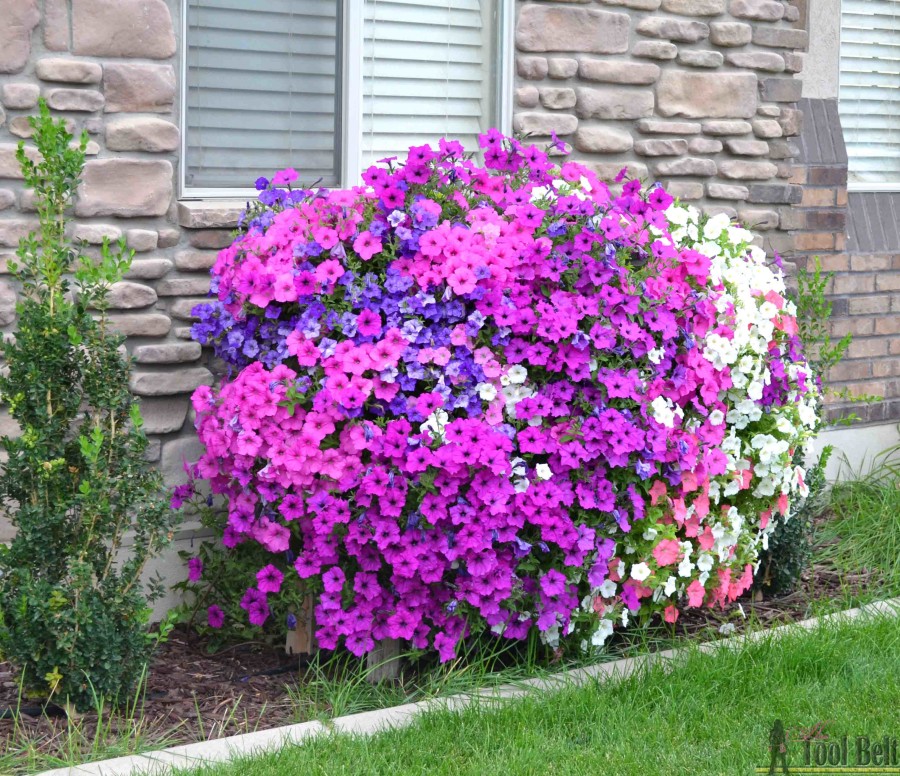
I can't wait for next year!  I think I'll add a few more variations of plants next time.  What are your favorite cascading plants?

Build a simple planter box out of pallets and enjoy the blooms all summer long.


For more woodworking plans check out Hertoolbelt
This post was temporarily redirected from hertoolbelt because of server issues.

Saturday, May 3, 2014

Norwegian Apple Cake

This Norwegian Apple Cake recipe has been the in family cookbook for many years, but I'd never tried it.  We were down visiting Grandma's (Mom) and she made this delicious, moist, apple goodness cake.  I asked where she got the recipe and low and behold, I have the recipe too!  I guess sometimes we get comfortable with the recipes that we know we like. 
I thought I would share this recipe, for others to enjoy too.  Plus it has real apples in it, so it has to be healthy right?  It makes a wonderful summer treat.  My hubby thinks it makes a great breakfast option, coming from the guy who eats lunch/dinner foods for breakfast. 


Norwegian Apple Cake Recipe

  • 2 cubes butter (1 cup)
  • 1 1/2 cups sugar
  • 2 eggs
  • 3/4 cups milk + a little more as needed
  • 2 tsp baking powder
  • 1/2 tsp salt
  • 2 2/3 cups flour
  • 3 large apples or 4 medium apples
  • cinnamon
  • sugar
Preheat the oven to 350 deg.  Cream butter and sugar really well.  Add eggs, milk baking powder, salt and flour.  The batter will be fairly thick.  Pour and spread into a lightly greased 9×13 inch cake pan.  Peel the apples, cut apples in half (stem thru end), remove the core.  Slice the apples thin, about 1/16″ to 1/8″ thickness.  
Place the apples slices in the batter standing up.  I like to start the apple slices about 1″ apart, then fill in with more apple slices until I’m out.

3 large apples in slices fills the pan. 

Sprinkle the top with cinnamon and sugar, to your taste.


Bake the cake at 350 degrees for 45-50 minutes, or until the middle doesn’t look doughy.  And enjoy the apple-y goodness.
Yummy delicious apple filled cake.


Saturday, April 12, 2014

Easter Chick Cake Balls

With Easter just around the corner, it's time to think of that cute treat to bring to the annual Easter party and Egg Rolling.  Wondering what Egg Rolling is?  Well we color our eggs so cute and write our names on our egg carton.  We take our eggs to a hill and roll them down the hill.  Then we chase after our eggs and roll them again, until we can no longer roll them.  And repeat.  Wondering what the point is, well me too...but that's what we do every year. 
Ok back to the treat.  My family seems to love cake balls, they gobble them up.  Sometimes I like to try different ways to decorate them.  I'm not the best by any means, but they're usually cute enough to eat!  These little chicks are perfect for Easter time and spring, and they are pretty easy to make.
I like to use the Wilton Recipe for cake balls.  For these chicks I used carrot cake, it seems spring-y to me (must be because of the bunnies).  But you can use whatever flavor you like. 

1.  Make the cake according to the Wilton Recipe for cake balls.
2.  When the cake is cool, crumble it up and mix in 3/4 can of cream cheese frosting.  Add more frosting as needed.
3.  Roll balls of cake/frosting that are about 1 1/4" to 1 1/2" balls. 
4.  Chill the balls, but don't freeze.  If you freeze them, it'll crack the chocolate as they melt.
5.  Melt white chocolate.  I usually melt it in the microwave 30 seconds, stir, 30 seconds, stir, etc.  A double boiler is also an excellent option.  Tint it yellow with yellow oil based coloring, or yellow melts.
6.  Place the chilled balls on skewers.
7.  Dip the cake balls in the yellowish chocolate and allow to set up. 
8.  Melt some orange melts or white chocolate colored orange, put in a Ziploc bag and cut a small opening in the corner.  On wax paper draw some chicken combs and beaks with the orange chocolate and allow to dry.
9. Use the orange chocolate in the bag and glue the combs and beaks onto the cake balls.
10.  Melt brown/black chocolate and make little chicken eyes.

There you go, look how cute all of those little chicks are.  Happy Easter and Spring Time!

Monday, March 17, 2014

Nursery Welcome/Check-in Poster

Our Nursery class leaders wanted to have a little check-in poster with the children's pictures on it.  We thought it would be a fun way to start Nursery each Sunday.  I put together this poster with the 2013 Primary theme which is Families are Forever.  I placed sticky Velcro dots on the right column to store the children's photos.  I also placed Velcro dots on each window (we have 15-20 nursery kids).  I printed the children's pictures and cut them into 3" circles and placed the other side of the Velcro dots on the back of the pictures.  The idea is to have the children pick their picture from the right side column and place it on one of the temple windows when they come into Nursery class.  The kids enjoy picking out their pictures. 
I thought I'd share the poster free printable in case you're looking to do something similar.  The picture is sized for a 16"x20" poster.  I printed mine at Costco, and it turned out nice.

Note:  the picture is from LDS and the papers and elements come from GG digital designs